Adding Students to a Class
To view your classes, tap on the Classes link on your Account page. This will land you on your Classes page. The Current Subscription Capacity -number of available seats in the subscription and the number of used seats - is displayed at the top of the page. Active Classes are listed below this. There are three basic methods to add students to these classes. We recommend Method 1 as it avoids the many issues that can occur when using Method 2 that relies on an email sent to a student email box.
Method 1: Adding Students When They Register
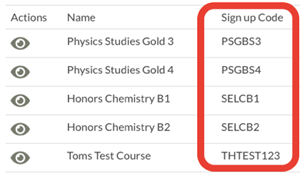
 The easiest way to add students to your classes is to have them use a Class Sign Up Code when they register. Class Sign Up Codes were invented when you created the class. On the Classes page, you will view a table listing your classes. One column of that table identifies the class sign-up codes. Each class has its own sign-up code. You will need to provide these to students before they register for Task Tracker. When they go through the registration process, they will be asked for a Class Sign Up Code. If they enter the correct code, then they will automatically be added to your class roster.
Method 2: Sending Email Invitations to Students
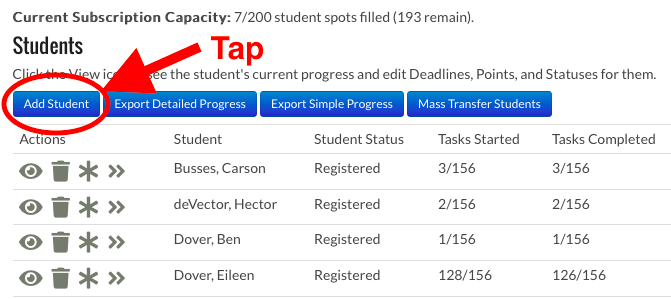
The second method of adding students to your class involves sending an email invitation to each individual student. Begin by tapping on the View button (.png) ) next to the class name on the Classes page. Every class page displays a roster of currently active and disabled students at the bottom of the page. There is an Add Student button located just above the roster.
) next to the class name on the Classes page. Every class page displays a roster of currently active and disabled students at the bottom of the page. There is an Add Student button located just above the roster.

Tapping on the Add Student button will pop up a window into which you can type or paste the email of a student whom you wish to invite to the class. You may enter as many email addresses as you wish, separated by commas or lines. If the student has already registered for a Task Tracker account, then they will be instantly added to your Class roster and notified by email that they have been invited. If the invited student has not yet registered for Task Tracker, they will be sent an email notification with a link to the Student Registration page. The Class Sign Up Code will automatically be placed into the Course Code field of the registration form. The invited student will simply have to fill out the remainder of the form and tap on the Register button. They will then appear on your class roster as a Registered student.
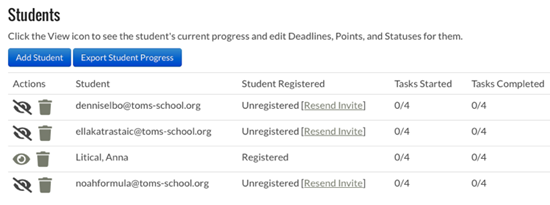
As you use this method, your student roster will grow and the registration status of all invited students will be stated in the roster of students as shown below. If you wish to resend the invitation to a given student, tap on the Resend Invite link.

We will caution you that Method 2 doesn't always work. And when it doesn't work, there is nothing we can do on our end to get it to work. There are two basic issues with the method, both related to the specifics of school email systems. They tend to be very secure and often filter out emails from outside of the district and especially from noreply@ - type emails. Our emails often do not make their way to the student. You could talk to IT and get us whitelisted or just use Method 1. The second problem is that our Join-a-Class emails often contain a token (a bit of code embeded in the email that performs an action). Such tokens are often scraped away by school systems as a virus-protection measure. This is why we recommend Method 1.
Method 3: Having a Student Add Themselves After They Join
If students have already registered, then they can add themselves to your class without being invited. The students simply need to know the Class Sign Up Code for your class. When they are in the Courses and Tasks page, they will see an Add Class button near the top of the page. Tapping on this button will pop up a window that invites them to enter a Class Sign Up Code in order to join an existing class. When students enter the Class Sign Up Code, they will appear on your roster as Registered students.

Want to view these directions as a PDF document?
Download PDF.